
Introduction
In today’s hyper-connected world, we generate mountains of digital data — from emails and documents to photos, calendar events, and playlists. But here’s a question most people overlook: what happens if you want to back up all that data or take it somewhere else? That’s where Google Takeout comes in.
If you have been asking yourself how to use Google Takeout, you are not the only one. This powerful tool which is often ignored allows you to export a copy of almost everything in your Google account, be it saving your precious memories, transferring files to a different platform, or just creating a personal backup for your convenience.
In this guide, we’ll break down how to use Google Takeout step by step, showing you how easy it is to take control of your data. Whether you’re a tech pro or a casual user, you’ll learn how to safely export and manage your Google content — without the tech jargon or overwhelm.
Ready to unlock your Google data? Let’s dive in.
What Is Google Takeout?
In advance of when we get started with the process how to use Google Takeout, let's be clear about what it is.
Google Takeout is an online application offered for free from Google which lets you make copies and backups of your data across all Google services like Gmail, Google Drive, Photos, Calendar, Contacts, YouTube, and more. Instead of having to search through each application separately, Google Takeout lets you organize all your data in a one simple file which you can download to your computer or upload onto an online service for storage.
The reason this is important? What are the reasons why people choose Google Takeout for backing up important documents before closing the Google account. Transferring data to a different cloud or platform. The ability to store personal memories including old photographs videos, emails, or photos. Archiving local files from school or work projects.
The best part is that you don't have to be a technical expert to comprehend the idea. Google created Takeout to assist users in making it simple and easy to manage the footprint of their websites.
The following section, we'll guide to joining and start how to use Google Takeout for exporting.
Step 1: Getting Started — How to Use Google Takeout Efficiently
Let’s get hands-on with how to use Google Takeout effectively — starting with the basics: where to find it.
To begin, go to takeout.google.com. This is the official landing page for Google Takeout, where you can sign in with your Google account and start preparing your data export.
If you prefer the long route, you can also navigate through your account settings:
- Go to Google Account > Data & Privacy
- Scroll down to Download or delete your data
- Click Download your data
Once you’re in, you’re officially ready to start using Google Takeout to export the data you want.
✅ Pro tip: Make sure you’re signed into the correct Google account (especially if you manage multiple accounts) — Takeout only pulls data from the active account you’re logged into.
In the next step, we’ll walk you through selecting which data you want to include in your export.
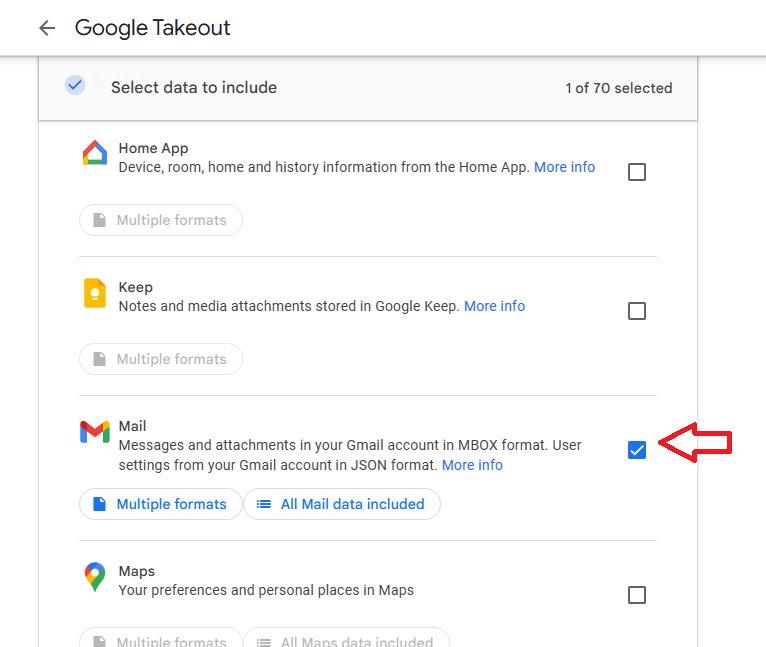
Step 2: Selecting the Data You Want to Export
After you've logged into Google Takeout, it's time to pick the information you'd like to export - a essential step to follow when learning the best ways to make the most how to use Google Takeout effectively.
Google Takeout is a comprehensive coverage of hundreds of Google services that include:
- Gmail
- Google Drive
- Google Photos
- Calendar
- Contacts
- YouTube
- Google Keep
...and many more.
By default, the applications you would like to download are selected which means you won't have to complete the whole procedure to download everything. You are able to:
Check and uncheck boxes in front of each service. Modify the information included (for example, you can only select specific folders in Drive or specific albums in Photos). You can choose different formats for data. Some services let you choose what format you want your file to be (like .mbox or.mbox for emails), or .json to manage the settings).
When you're making use of Google Takeout for the first time, you should start small maybe saving Gmail or your Photos to get familiar with the process before creating a complete Backup of your accounts.
After you've picked your options you're now prepared for the next step: creating your preferences for export. The next step will be addressed!
Step 3: Choosing Export Settings
Once you've picked the information, it's time to set up the way that Google Takeout sends your data -here you can alter the file's structure, delivery method, and frequency.
Here's the information you'll need to determine:
File Type & Size
- Choose between .zip (most common) or .tgz formats.
- Select a maximum file size (2GB, 4GB, 10GB, etc.). If the file is larger, Google Takeout will split the file into several.
Delivery method
When you are learning how to use Google Takeout, this aspect is crucial! Your archive can be delivered to you via:
- Email download link
- Add to Google Drive
- Add to Dropbox
- Add to OneDrive
- Add to Box
Export Frequency
You can pick:
- Once-time export (perfect for backups or for account changes)
- Exports scheduled (set for export once every 2 months over a yearit is useful if you require automated backups)
After you've viewed the settings, you're now ready to begin the process of creating your export. Google Takeout gives you flexibility to decide precisely the way and what your data is used So, take the time to check these settings again prior to proceeding.
👉🏽 While Google Takeout helps with manual backups, you might also explore automated Google Sheets backup to keep your spreadsheets continuously safe without lifting a finger.
Step 4: Creating and Downloading Your Export
You've got everything set upnow is the time to create the export and transfer your files. That's where the power that is making how to use Google Takeout really kicks into.
Select "Create export"
Once you click on that button, Google Takeout will start making your archive. Based on the amount of information you have chose to store, it could take anything between a few minutes and many hours (or even days in the case of large accounts).
Be patient for the Email notification
It's not too late. don't need to sit back and wait around as Google will notify you via email once your export is complete. If you select the cloud-based delivery option (like Drive or Dropbox) and you'll see the files in those services. If you chose the email option to download, you'll be presented with an option to download.
Upload Your Data
If you receive the message Click the link and then download your exported file. Make sure you have plenty of available storage on your PC or an external hard drive particularly when you're backing up large video files or full Drive folders.
Review the downloaded files
After you've downloaded everything unzip the files and verify whether everything you want is in the files. Understanding how to utilize Google Takeout isn't just about creating an exportit's about ensuring that you are able to access and utilize the information afterward.
Best Practices and Tips for How to Use Google Takeout
Now that you've learned how to use Google Takeout from start to finish, we'll go over some tips that will ensure you don't make common errors and maximize the value of your exports.
Tip 1. Keep track of the Sizes of Files
In the event that you're exporting huge amounts of data, you can split the export into smaller ones or opt for a cloud-based delivery option. Downloading large multi-gigabyte files via the internet is a nightmare (and occasionally not work).
TIP 2: Securely store your export in a secure location
After you've downloaded your file, save it in an safe place -- best with an external drive, or on encrypted cloud storage. Be aware that your archive holds sensitive personal information Don't let it sit lying around in a vulnerable location.
Tip 3: Recheck data regularly
Utilizing Google Takeout isn't a one-time thing. Make sure to schedule regular exports (every couple of months) to maintain an up-to-date copy of the account specifically when you're handling important emails, files or business data.
Tips 4: Be aware of the content you download
The majority of data file in an export is an accessible format for users. For instance, Gmail exports use the .mbox format, which requires an email viewer or email client to open. Be sure to know how to manage the files that you export.
Tips 5: Remove old exports you no longer Are Needing
to avoid chaos and minimize security risks, it is recommended to periodically remove old or obsolete exports you no longer need.
If you follow these guidelines You'll be using Google Takeout like a pro -not only for one-time exports but as a part of a comprehensive personal routine for managing your data.
Final Thoughts: How to Use Google Takeout for Smarter Data Management
Mastering how to use Google Takeout gives you real control over your Google data — whether you’re backing up important files, switching platforms, or simply keeping a local archive of your digital life.
The best part? Google makes it accessible for both tech-savvy users and beginners, with an intuitive interface and flexible options that let you export exactly what you need, when you need it.
By following the steps in this guide and applying the tips we covered, you’re set up to:
✅ Protect your personal or business data
✅ Create smooth transitions between cloud platforms
✅ Maintain peace of mind knowing your information is safely backed up
So go ahead — put this knowledge into action and start using Google Takeout today. Your future self will thank you.
👉🏽Using Google Takeout is a smart move to back up and control your personal data across Gmail, Drive, Photos, and more. But remember, protecting your data isn’t just about backups — it’s also about how you share it. For even stronger email privacy, check out this guide on Gmail Confidential Mode to learn how to send sensitive emails securely, set expiration dates, and prevent unauthorized forwarding. Together, these tools give you a powerful mix of backup and privacy in the Google ecosystem.
Related Post:
%201.png)

%201.png)

%201.png)