
Handling a flood of access requests for your Google Docs and Sheets can be a real headache, especially when you're already juggling old users who no longer need access and new folks eagerly waiting to jump in. Since here you have to provide access of your doc or sheet to the new ones and have to revoke the access from the previous ones as there is a limit on access holders.
But guess what? There's a super easy way to make this whole process a breeze – and it's all about automation! Imagine you've got this magical little helper that can automatically perform all the tedious work for you. All you need to do is give it the right instructions only.
For this, you just need to start by telling your helper where you need to take action. Then, you will have to play a quick copy-paste game only.
How Do You Automate Your Google Doc and Sheet Management Process?
Here are the following steps that you need to follow to make your access management work automated.
Let’s start to automate your Google Document as well as sheet access-sharing and removing management processes within a proper record.
First, you need to copy the URL of the sheet in which you want to maintain your access sharing automation and access revoke automation. Once you have copied the sheet URL, you have to go to the Extension option of the page and click on the Apps Script button. As you do, the Apps Script coding section opens to you, here, you need to paste the code first, along with giving a name to your project.
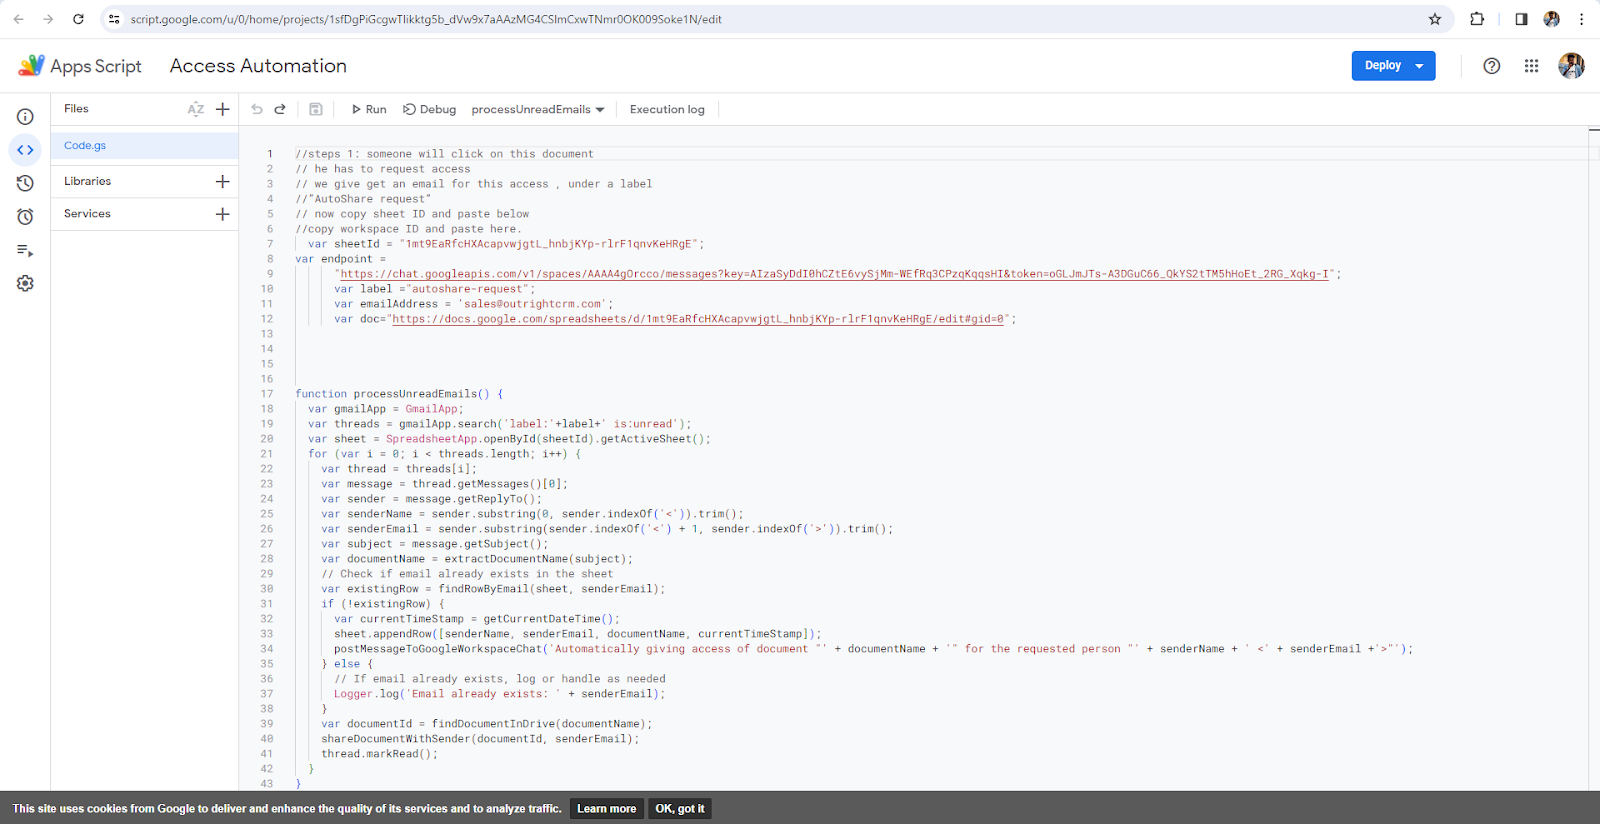
For further, you have to paste the copied URL of the sheet in front of Doc in between inverted commas. Next, you need to paste the URL again from the slash icon after “d” to its next slash icon before the edit option in front of the script's Sheet ID. Now, put your email ID in front of the email address where you want to get the email.
Now, go to Google Workspace and create a New Space by clicking on the New Chat option. Next, click on the “create a space” button and give an appropriate name like we have given “autoshare-request” and click on the “create” button. Go to the drop-down button of the created space and select the Apps and Integrations option.
Next to this, click on the “Add Webhooks” button showing at the bottom right of the page and click on the “Save’ button by pasting the space name there to start the automation process. Now, click on the three-dot icon, and will copy the link. Once it’s done, go back to your Apps Script’s coding section again and paste the copied link in front of the “endpoint” between both inverted commas.

Now, you will see that whenever you will get an email for access share, then that email address will automatically get access. Plus, all entries will automatically get updated in the sheet, like email address, user name, date, time, & more, along with an automated notification on the created space.
What are Filters? What Do They Do?
Filters in Apps Script are something that allows you to control the programmatic display of data in Google Sheets by specifying criteria. For example, the number of raw that need to be displayed or hidden, enhancement of data analysis, and presentation capabilities as well.
By applying the filters in Apps Script, you can manage and facilitate selectively displaying data and analysis of that as well. Thereby, filters allow you to enhance the functionality and automation capabilities of your Google spreadsheet and Documents as well.
How to Automate Filters? Stepwise Configuration:
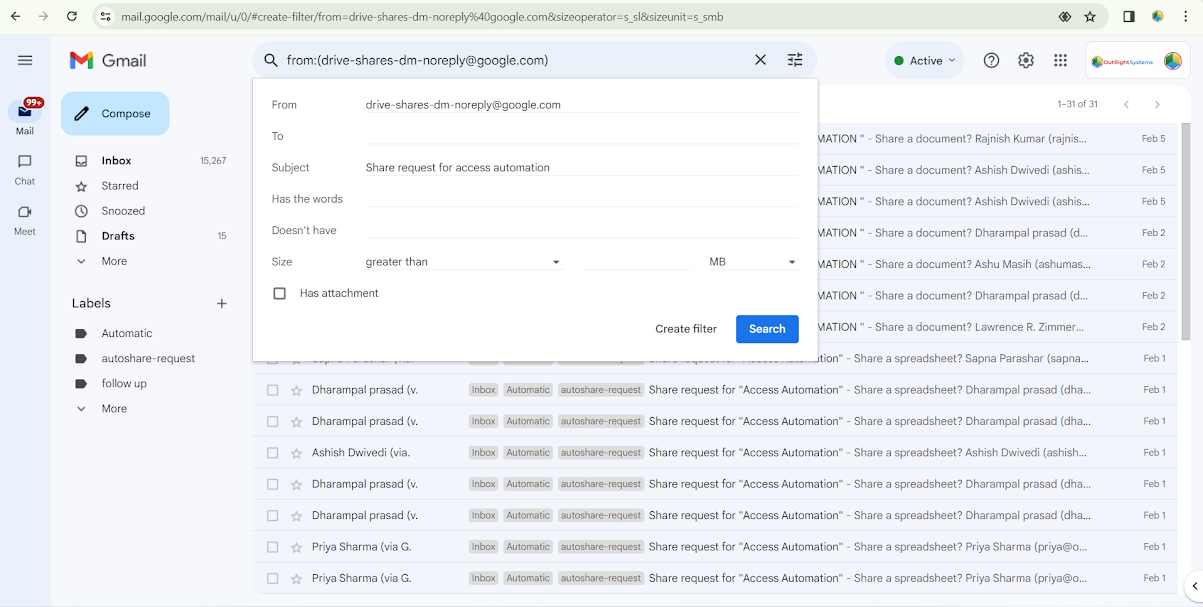
You are allowed to set filters on any of the desirable emails to which you want to bring in the particular label. Hence, to start the process, you first need to open up the email and then click on the three-dot icon.
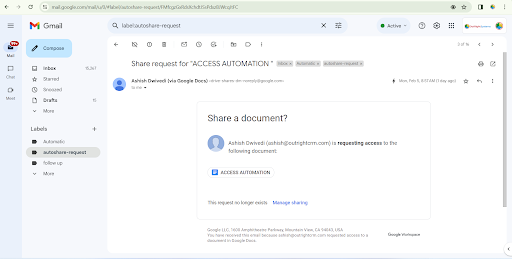
As you can see, the “Filter messages like this” option. Hence, you need to give it a subject and click on the “Create the Filter” button.
Here, we’ll give the subject “Share request for “Access Automation” and will click on the “Create filter” option.
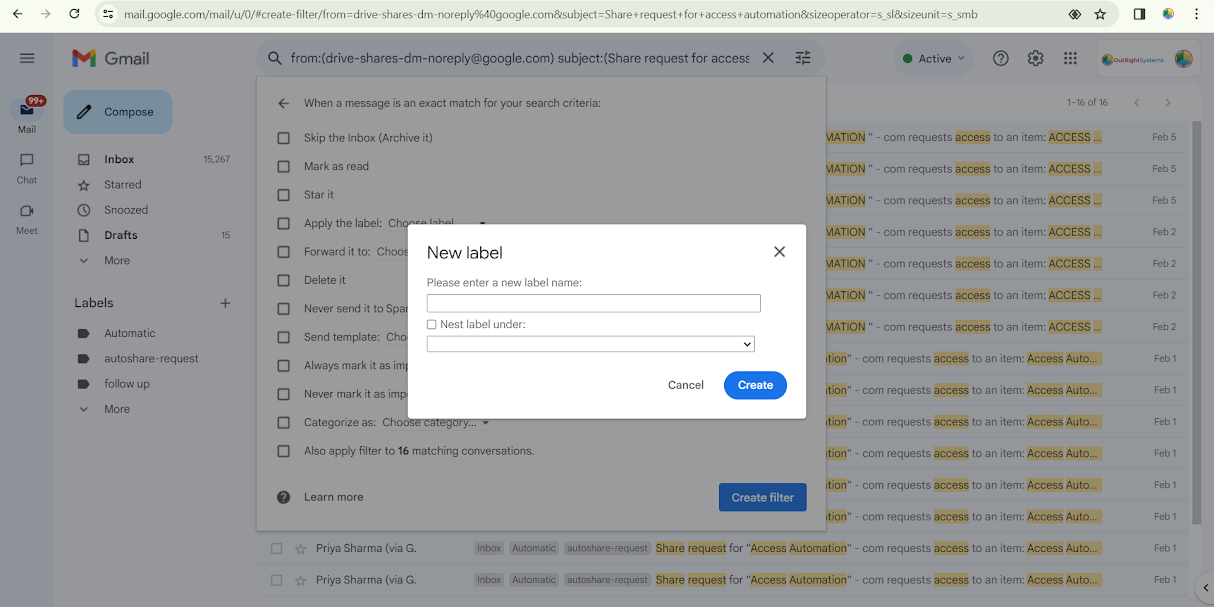
As you will click on the “Create filter” option, the options list will open up to you. So, you need to click on the “Apply the label” option and then click on the “New label” option by selecting on the “choose label” button.
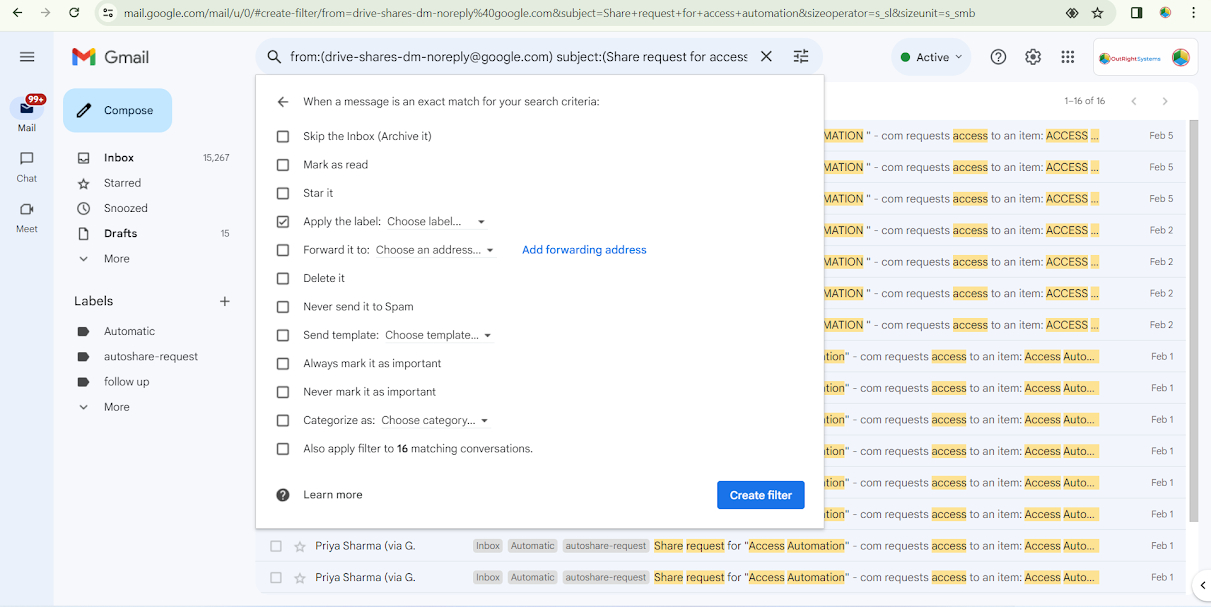
Now, we will give an appropriate name to the label, such as “autoshare-request” for our label, and click on the “Create” button.
To add more filters, we’ll click on the “Also apply filter to 1 matching conversation” option. And finally, your filter has been added here. Therefore, this is how you can simply add the filter to your access automation.
What are Triggers? What Do They Do?
In Google spreadsheet and documents, Apps Script are functions that automatically run based on specific events or time intervals. They allow developers to automate any tasks, such as sending emails, updating spreadsheets, and responding to user actions without any manual intervention.
You are allowed to make your triggers time-driven or event-driven and can make your overall workflows streamlined within Google Workspace applications. Since, triggers play a crucial role in automating repetitive tasks, improving efficiency, and reducing errors in Google Workspace workflows. Additionally, by leveraging triggers effectively, developers can streamline processes and focus on higher-value activities.
How to Automate Triggers? Stepwise Configuration:
Triggers in the Apps Script are straightforward to create and update hence, to create your desired Triggers, you just need to execute the following steps:
Go to the script section of the Apps Script coding page and then click on the Trigger option showing on the left side panel next to the clock icon. You need to add two triggers here, one for “processunreadEmails” and the other for “revokeAccess” within their specific timing. Since the “processunreadEmails” will automate your access-sharing task, while the trigger for “revokeAccess” will automate your access-revoking task.
Hence, to add each trigger, go to the “Add Trigger” button shown in the bottom right corner and add functions accordingly. For this, select the “processunreadEmails” option in the function, the “Head” option in deployment, the “Time-driven” option in the Event source, the “Day Timer” option in trigger’s type, and “2 am to 3 am” option in time of the day means time interval.
To create the next trigger, which is for the automated access removal process, click on the “Add trigger button” and select the “revokeAccess” option in the function.
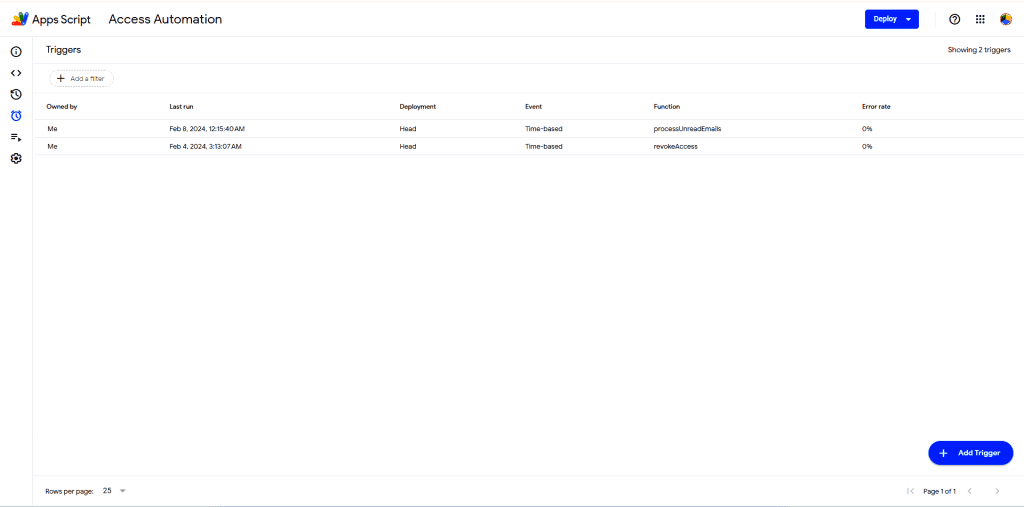
For further, choose the “Head” option in deployment, the “Time-driven” option in the Event source, the “Week Timer” option in trigger’s type, and the “Every Sunday” option in time of the day of the week, “Midnight to 1 am” in time of day, and finally will click on the “Save” button.
You are completely allowed to add more than two filters based on your specific requirements and make your work fully automated.
This is just the viewpoint of the script (code) for both triggers – one for the revokeAccess function and one for the function
function revokeAccess() {
  var file = DriveApp.getFileById(sheetId);
  var mimeType = file.getMimeType();
  if (mimeType === MimeType.GOOGLE_SHEETS) {
    revokeAccessFromSpreadsheet(sheetId);
  } else if (mimeType === MimeType.GOOGLE_DOCS) {
    revokeAccessFromDocument(sheetId);
  } else {
    Logger.log("The file is neither a Google Sheet nor a Google Doc.");
  }
}


function processUnreadEmails() {
  var gmailApp = GmailApp;
  var threads = gmailApp.search('label:'+label+' is:unread');
  var sheet = SpreadsheetApp.openById(sheetId).getActiveSheet();
  for (var i = 0; i < threads.length; i++) {
    var thread = threads[i];
    var message = thread.getMessages()[0];
    var sender = message.getReplyTo();
    var senderName = sender.substring(0, sender.indexOf('<')).trim();
    var senderEmail = sender.substring(sender.indexOf('<') + 1, sender.indexOf('>')).trim();
    var subject = message.getSubject();
    var documentName = extractDocumentName(subject);
    // Check if email already exists in the sheet
    var existingRow = findRowByEmail(sheet, senderEmail);
    if (!existingRow) {
      var currentTimeStamp = getCurrentDateTime();
      sheet.appendRow([senderName, senderEmail, documentName, currentTimeStamp]);
      postMessageToGoogleWorkspaceChat('Automatically giving access of document "' + documentName + '" for the requested person "' + senderName + ' <' + senderEmail +'>"');
    } else {
      // If email already exists, log or handle as needed
      Logger.log('Email already exists: ' + senderEmail);
    }
    var documentId = findDocumentInDrive(documentName);
    shareDocumentWithSender(documentId, senderEmail);
    thread.markRead();
  }
}
To have a complete code, please drag this article by the end and send your request to us. Hence, we’ll share access to the script with you, and you’ll get the code.
What are Executions? What Do They Do?
Executions are just like the end result, where you can have all the information about your triggers within their specific timing and function by going to the Executions option. For example, when triggers were created, their timing, status, and more. Apart from this, you can add filters in execution to check the last five minutes added triggers’ activity or the last triggers’ activity and more.
How to Configure Executions?
Go to the “Executions” option showing on the side panel just down to the Trigger option. And check out the activities of all added triggers, including their multiple parameters such as start time, duration, function, status, type, and deployment.
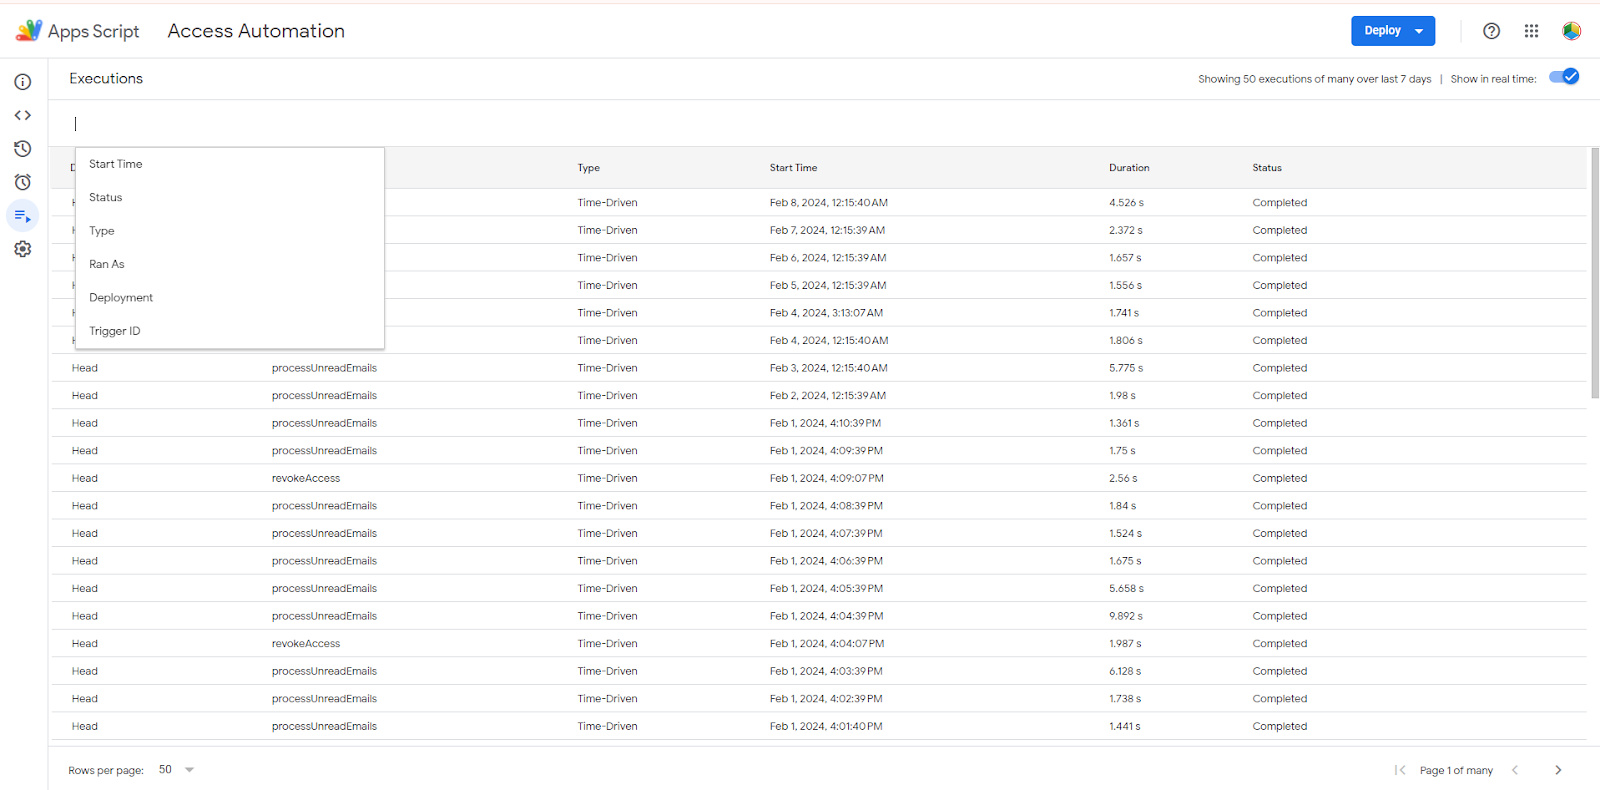
Within this filter button, you will get many options such as in Start time - last 5 minutes, 30 minutes, 1 hour, 24 hours, in Status - Running, Paused, Completed, Cancelled, Failed, Time out, Disabled, in Type - multiple options again, In Deployment - Head and can put Trigger ID.
For example, if you’ll set the “last 5 minutes” execution through the Start time by clicking on the Apply button, then only the last 5 minutes added filters will display to you.
Let’s Recap Before You Go!
In this article, we’ll thoroughly explain to you how you can manage any Google sheet access automatically & get their notification on space with proper entries in the sheet. Furthermore, we’ll let you know how to add filters and create triggers with their proper executions. Therefore, without any perplexion and delay in work, let’s jump into the article directly.
Please Ask for the complete Code below
%201.png)

%201.png)

%201.png)