


The goal of every website is to be effortlessly navigable across several platforms, including desktop, mobile, web, and iOS. Since it offers a smooth and efficient experience to the customer, which accurately reflects the brand and enhances the goodwill in the market. However, From the developers' point of view, creating a flutter app for a WordPress website is a challenging task.
Therefore, here we'll walk you through the simple and straightforward process of building a Flutter app within a few steps, along with its benefits.
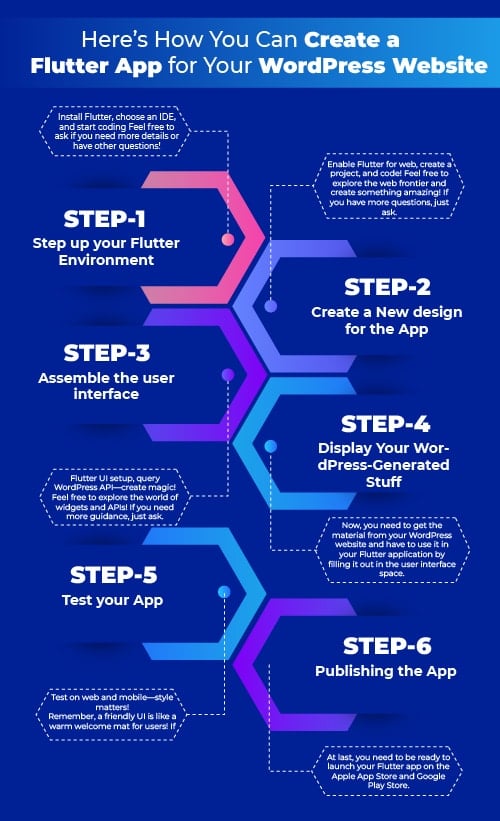
Here's How You Can Create a Flutter App for Your WordPress Website
Following these 6 steps, you can create your Fluter app and run it on the WordPress website smoothly. So, let’s follow them!
Step 1: Step up your Flutter Environment
Here, first, you have to install the Flutter framework by following the official installation instructions exclusively. After it's finished, you need to choose an IDE for developing Flutter apps, such as Android Studio or Visual Studio Code.
Step 2: Create a New design for the App
Next to that, you have to generate a new Flutter project using the Flutter CLI (Flutter Command Line). This will assist in setting up a web directory inside your project and enable Flutter for the web.
Step 3: Assemble the user interface
In this step, you have to set up the UI (User Interface) for your Flutter application using the Flutter widgets. From here, you can use HTTP queries to the WordPress REST API to retrieve the data from your WordPress website.
Step 4: Display Your WordPress-Generated Stuff
Now, you need to get the material from your WordPress website and have to use it in your Flutter application by filling it out in the user interface space.
Step 5: Test your App
For better testing, you are required to test your app on both web browsers and mobile emulators or devices. Make sure the UI and style of your app are mobile-friendly.
Step 6: Publishing the App
At last, you need to be ready to launch your Flutter app on the Apple App Store and Google Play Store.
Note:- Many people don’t want to use placeholder posts in their WordPress framework while creating their fluter application whereas, some love to do so. Therefore, let me assist you in figuring out whether you need to use the placeholder post in your WordPress or not.
Advice: Instead of using a placeholder post, you can move towards WordPress plugins that will not only handle your workflow smoothly but also will offer site security, better SEO, e-commerce functionality & more.
Why do you need to Create a Flutter App for Any WordPress Site?
Creating a flutter application for any WordPress website not only generates the strong and professional goodwill of the brand but also provides the following benefits!
1. Expressive and Flexibe UI:
Using the WordPress framework while creating the Flutter app, you can have the experience of a rich set of pre-designed widgets for creating customized UIs.
2. Smooth Performance:
Here, you are allowed to use the Dart programming language and compile it to native code, ensuring high performance.
3. Single Codebase:
If you are designing a flutter app using the WordPress framework then you have to write a single code once and you can run it on multiple platforms further.
4. Strong Community Support:
It provides large community support and an extensive library of packages along with plugins
5. Integration with Existing Code:
Flutter can easily get integrated with existing web applications and can coexist with other technologies. Consequently, you’re allowed to incrementally migrate to Flutter without having to rewrite the entire codebase.
6. Quick Development:
The hot reload feature will allow you to make quick changes and instant feedback together.
7. Access to Native Functionality:
Experiencing Flutter, you can get free access to the native device features such as camera, GPS, and storage as flutter provides these features. You can use this for creating web applications that require access to device-specific functionalities.
8. Open Source Service:
As all know, flutter is an open-source framework, you can use it for free and get a transparent development process. Plus, you can customize it accordingly to meet your specific needs.
Here you have got the reasons that will push you towards using the WordPress framework while designing your Flutter application. To implement these efficiently, many businesses partner with experienced Flutter development services providers who can streamline the process and ensure smooth integration. Therefore, let’s have a look at the mentioned points to know the stepwise guidance on creating a flutter app for any WordPress website.
What is a Paceholder Post?
A placeholder post refers to a post, image, or dummy text which is used as a temporary entry on a website or blog to reserve a spot for future content. For Example:- Generic Titles, Sample Images, Categories and Tags, Dummy Text, and so on.
Basically, it contains minimal information such as a title, basic text, or a "coming soon" message. Website developers use placeholder posts to maintain a consistent structure on the site and allow easier planning and organization of upcoming content.
Placeholder posts are particularly useful during the design and development phase to ensure that the layout and navigation elements functioning correctly even when the final content is not yet available or not. Once the actual content is ready then the developers replace the placeholder post with the full post.
Why Should You Remove Placeholder Posts in WordPress?
When website developers create a Flutter app that integrates with a WordPress backend then it is essential to know “how to get rid of placeholder posts” for several reasons:
1. Data Integrity:
Placeholder posts give a cluttered look to the database and make it harder to manage and retrieve the real content. So, avoiding placeholder posts can keep your database clean and ensure that all data is valid and relevant.
2. Performance:
If you will use excessive placeholder content in your website development then it can slow down the app by increasing the amount of data that needs to be loaded and processed. Plus, eliminating the placeholder posts can enhance the performance and responsiveness of your application.
3. SEO and Analytics:
If you will use placeholder posts it will impact your SEO negatively by creating irrelevant or duplicate content. In addition to this, it will also skew analytics data, making it difficult to track user engagement and behavior accurately.
4. User Experience:
The biggest reason behind not using placeholder posts is that placeholder posts with dummy text and images can confuse users and make your app look unprofessional. Additionally, removing them ensures that only relevant and meaningful content is presented to users.
5. Content Accuracy:
Typically the placeholder posts get indexed by search engines or shared by users which leads to misinformation or outdated content being circulated. So, you need to sure that your entire content is accurate and up-to-date to avoid further issues.
6. Professional Appearance:
If you will use a clean and placeholder-free app, then it will appear more polished and trustworthy to users. Which will be useful in building credibility and a positive impression of your application.
7. Maintenance:
In case you have decided to move to using placeholder posts, don’t forget to be ready to manage a website or app with additional effort to ensure the placeholders don't go live accidentally. Consequently, removing placeholder posts from your development reduces the risk of such mistakes and simplifies content management.
8. Consistency:
Placeholder posts can disrupt the consistency of your application’s content. So, you need to remove them to ensure a uniform presentation and coherent user experience.
Let’s Recap Before You Go!
This blog post will give you a comprehensive guide on creating a flutter app for any WordPress website in just only 5 steps along with the proper behind-the-scenes causes. Moreover, you will get a complete knowledge of the placeholder posts, their role, their essentiality in the WordPress framework, and the steps to remove them. So, without making any delay let’s jump into the main content.
%201.png)

%201.png)

%201.png)