


You must have seen the address label on your Myntra or Amazon parcel. If it doesn’t have a street name or correct PIN code, the parcel sits in a warehouse untouched. An invoice works the same way. It tells your customers who you are, what they owe, and where to send the money. If you leave out even a single detail, your payment gets stuck. That’s what makes learning how to create invoices worthwhile. It is useful whether you’re a freelancer, a shop owner, or a small business with a handful of clients. This comprehensive guide covers what an invoice is, what information it includes, and how to create one without stress.
What Is an Invoice?
An invoice is a document that you send to your customers after they’ve purchased something from you or done work for you. It contains details like what you provided, how much it costs, and the payment deadline. You can also think of it as a polite, written request asking for money. Moreover, it also works as a record for the future. Both you and your customer can look back at it later to check what was agreed upon if needed. That record holds a significant importance for tax purposes and bookkeeping.
6 Common Types of Invoices and When to Use Them
Every business is different and not every sale needs the same kind of invoice. Let's see the most common types of invoices:
Standard Invoice: This is the everyday invoice that you send after someone finishes a job or delivers goods. It typically shows what was sold, at what price, and the date of the payment.
Pro Forma Invoice: This type of invoice is sent before the work even starts or the goods ship. It informs the customer beforehand, so they stay prepared. It's more like an estimate but not the final request for payment.
Recurring Invoice: As the name suggests, this one repeats on a schedule, such as every month. This invoice is for ongoing services like electricity bills, website maintenance, or monthly retainers.
Progress Invoice: These types of invoices are used for long projects. You set a milestone and bill clients in stages as each part is finished. This way, you aren’t waiting for months to be paid.
Timesheet Invoice: This bills clients by the hour. It lists the hours worked and the hourly rate, so the total is easy to check.
Credit Memo: You usually send this invoice when you need to reduce what a customer owes you, perhaps because of a return or a mistake.
What Information Should an Invoice Include?
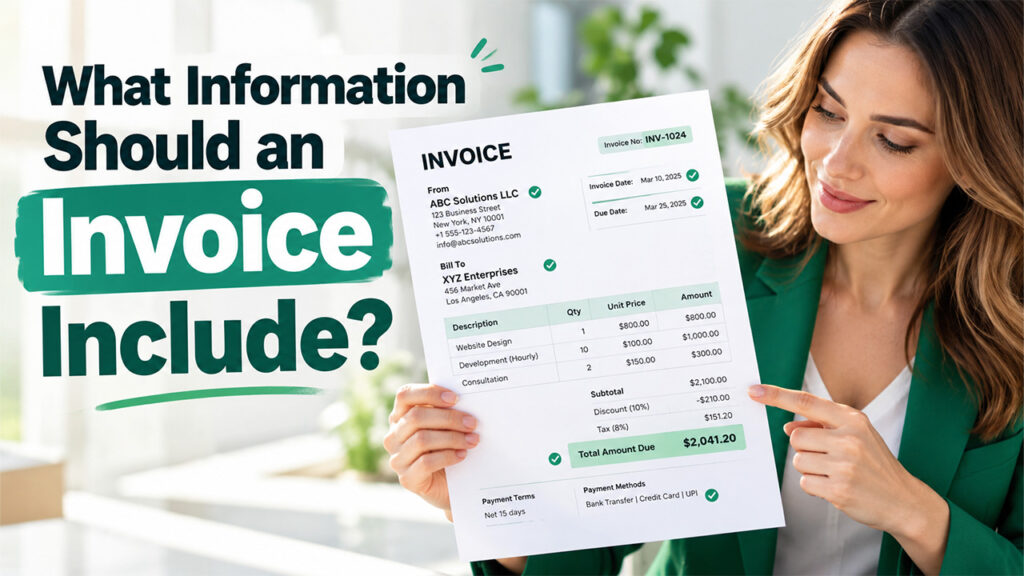
Don’t leave people guessing; every invoice needs to spell out the essentials. Customers expect certain details, and missing them just leads to confusion.
- Put “Invoice” and a unique invoice number right up top. That tells your client exactly what they’re looking at, and the number makes it easy to find or reference later.
- Share your business information, such as name, address, phone number, and email address. If you’re registered for taxes, mention your tax number too.
- Include your customer’s details like their name, company name, and billing address. This makes it clear who’s actually responsible for the payment.
- Set the record straight with invoice dates. The invoice date says when it was issued; the due date announces when the payment deadline hits.
- Break down the items. List each product or service clearly, along with quantity and price. Skip vague lines like “work done”. This will only invite emails and questions.
- Show taxes and discounts on separate lines. That way, your client sees exactly how the numbers add up.
- Let the total amount due stand out. Clients should never need to search for the bottom line.
- Explain payment terms and methods. Spell out how they can pay, whether by bank transfer, card, UPI, or whatever works. If there’s a late fee, mention it. That helps everyone stay on the same page.
How to Create Invoices in 7 Simple Steps
If you don’t know how to create an invoice from scratch, these seven steps will take you through it.
- Choose an Invoice Format or Template: You can pick any template of your choice in Word, Google Docs, or Excel. You can also use invoicing software. Just remember to keep the layout clean and easy to read in whatever you choose.
- Add Your Business Information: Now add your business name, logo, address, and contact information like phone number or email address at the top. This tells customers who the invoice is from right away.
- Enter Your Customer’s Billing Details: Now write your customer’s full name or company name and their billing address to make it clear that you reached the right person. A wrong name can create confusion and delay approval on their side.
- Add an Invoice Number and Important Dates: Use a simple system, like INV-001, INV-002, and so on. Then add the issue date and the due date.
- List the Products or Services Provided: Write the name of each product or service clearly on its own line to avoid any doubts. To be more precise, include the quantity, the rate, and the cost for each one.
- Calculate Taxes, Discounts, and the Total Due: Show the subtotal first, then any tax or discount, then the final amount. Double-check the math to avoid any discrepancy.
- Add Payment Instructions, Review, and Send: Carefully mention your bank details or payment link and include your late fee policy, if you have one. Before sending out, read the invoice once more, then send it by email or print it.
Different Ways to Create Invoices for Your Business
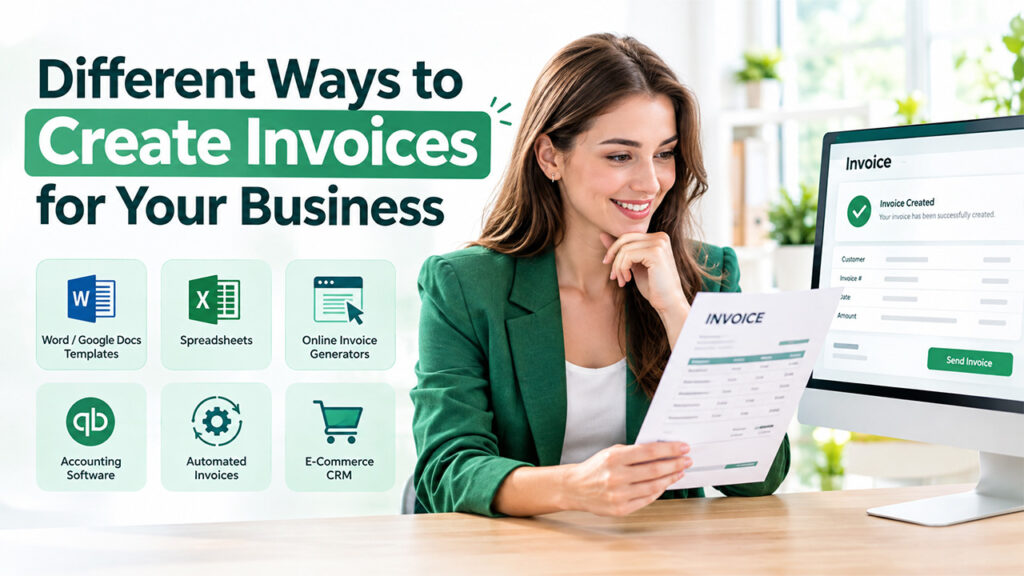
If you’re looking for a single right method, there is none. The best method depends on how many invoices you send and how much time you have on hand.
Word or Google Docs Templates: These are simple to use and free. If you only send a few invoices a month, they work pretty well. However, you’ll have to edit each invoice by hand, which takes time. So, go for these if you have spare time to do manual labor.
Spreadsheets: A spreadsheet can easily handle the math work for you, which reduces the chances of errors. It works well if you want a bit more structure without having to pay for anything.
Online Invoice Generators: These are easy to operate. You just have to fill out a form, and the tool gives you a finished invoice. They're quick, but the features are often basic, so they only do the bare minimum.
Accounting Software: You can also use tools like QuickBooks that let you create invoices, track payments, and manage taxes in one place. They save a lot of time once your business grows, and you don’t have to juggle multiple tabs to dig out information.
Automated Invoices: Some tools send invoices on their own, based on a schedule or a completed order. They are called “automated invoices.” Once you set things up, you no longer have to chase the same task every month. Invoices go out automatically based on pre-defined rules.
E-Commerce CRM: If you run an online store, an E-Commerce CRM can connect invoices to orders and customer records. Everything stays in one place, so nothing gets lost between the sale and the bill.
Best Practices for Creating Invoices and Getting Paid Faster
Creating the invoice is only half the job. These habits help you get paid on time:
- Send Invoices Promptly: As soon as the work is done or the goods are delivered, send out the invoice. The longer you wait, the longer your customers take to pay.
- Keep Invoices Itemized: Every charge or item must be written in plain, simple words on its own line. When a customer understands the bill, he will be less likely to question it and pay in a timely manner.
- Number Invoices Sequentially: Arrange your invoices in order. It helps you keep your records organized, and tidy, and you can easily spot if an invoice goes missing.
- Set Clear Payment Terms: Clearly mention the due date of the payment. And if you charge a late fee, mention it, so it never comes as a surprise to clients.
- Offer Multiple Payment Methods: Different people prefer to pay differently. Some customers like bank transfers, while others prefer UPI or cards. Making payment easier for customers means you get paid fast.
- Keep Digital Records: Save every invoice you send and organize the ones you receive too. You can use Invoice Scanner Software. This software reads paper or PDF invoices and turns them into digital records, which saves you from typing everything in by hand.
- Follow Up on Late Payments: If a payment is delayed, send a short, friendly reminder. Most delays are simple oversights, not bad intentions.
Conclusion
Invoices are not complicated and they shouldn’t be. If you feel overwhelmed, start with a simple template, include all important details that your customer needs, and send it on time. As your work grows, you can move to better tools that can handle repetitive tasks for you. The goal is to make the process feel easy to run, so you don’t have to spend too much time on paperwork and can focus more on the work you enjoy. Now that you know how to create invoices, you can build a routine that suits your business and keep your cash flow steady with one clear invoice at a time.
Frequently Asked Questions
What's the first thing I should do when creating an invoice?
Start by choosing a template or tool, then add your business details and your customer details. Getting this right from the beginning prevents confusion and delays later.
Do I really need an invoice number?
Yes. A unique number helps you track payments, find old invoices quickly, and keep your records tidy. It also makes tax time much easier.
How soon should I send an invoice after finishing the work?
Send it as soon as the job is done or the goods are delivered. Sending it quickly keeps the details fresh and helps you get paid sooner.
Can I make an invoice without special software?
Absolutely. A simple Word, Google Docs, or Excel template works fine. Just make sure it includes every key detail, such as items, totals, due dates, and payment instructions.
What's the difference between an invoice and a receipt?
An invoice asks a customer to pay. A receipt confirms that the payment has already been made. You send the invoice first and the receipt afterward.
%201.png)

%201.png)

%201.png)